
1、环境准备(all+root)
1-1、修改主机名
#每台主机执行,并修改hostname
hostnamectl set-hostname server1
1-2、修改host文件
sudo tee -a /etc/hosts <<-'EOF'
192.168.1.235 server1
192.168.1.236 server2
192.168.1.237 server3
EOF
1-3、创建postgres用户
useradd -m -U postgres -s /bin/bash
# 修改postgres用户密码
passwd postgres
1-4、创建安装目录
mkdir -p /app 1-5、安装依赖包
sudo apt install -y gcc zlib1g zlib1g-dev make 2、安装数据库(all+root)
2-1、下载部署包
2-2、上传postgresql安装包到/app目录
2-3、解压数据库包
tar -zxvf postgresql-15.2.tar.gz2-4、配置安装信息
cd postgresql-15.2
./configure --prefix=/app/postgresql-15.2 --without-readline
2-5、执行make安装
cd postgresql-15.2
make world && make install-world
2-6、创建归档目录和日志目录
mkdir -p /app/postgresql-15.2/archivedir && mkdir -p /app/postgresql-15.2/logs2-7、修改用户组
chown -R postgres:postgres /app2-8、配置环境变量
sudo tee -a /etc/profile <<-'EOF'
export LD_LIBRARY_PATH=/app/postgresql-15.2/lib
export PATH=/app/postgresql-15.2/bin:$PATH
export MANPATH=/app/postgresql-15.2/share/man:$MANPATH
EOF
source /etc/profile3、初始化数据库(server1+postgres)
💡 提示
只在主节点(server1)上执行。
3-1、初始化
su postgressource /etc/profile
pg_config💡 提示
用户postgres登录,查看数据库安装信息。

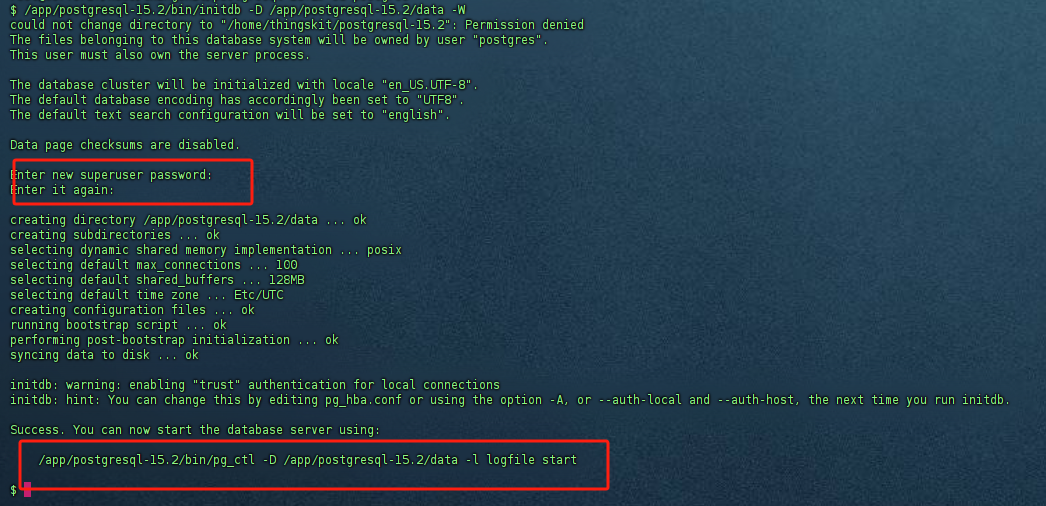
/app/postgresql-15.2/bin/initdb -D /app/postgresql-15.2/data -W💡 提示
初始化过程中需要输入超级管理员postgres的密码和确认密码。
3-2、修改postgresql.conf文件
💡 提示
将配置信息追加到配置文件/app/postgresql-15.2/data/postgresql.conf末尾。
tee -a /app/postgresql-15.2/data/postgresql.conf <<-'EOF'
listen_addresses = '*'
max_connections = 500
#port = 5432
#wal_level = replica
#max_wal_senders = 10
#max_replication_slots = 10
#hot_standby = on
wal_log_hints = on
password_encryption = 'md5'
logging_collector = on
log_directory = '/app/postgresql-15.2/logs'
log_min_messages = debug1
EOF
3-3、修改pg_hba.conf文件
💡 提示
将配置信息追加到配置文件/app/postgresql-15.2/data/pg_hba.conf末尾。
tee -a /app/postgresql-15.2/data/pg_hba.conf <<-'EOF'
host    all             all             0.0.0.0/0            md5
host    replication     all             0.0.0.0/0            md5
EOF
4、安装Keepalived(all+root)
4-1、安装keepalived
apt-get update
apt-get install keepalived
4-2、配置环境变量
添加系统环境变量
💡 提示
环境变量的值根据实际情况调整,例如:PG_BIN_PSQL、PG_DATA_DIR、KEEPALIVED_VIP等。
💡 提示
部分版本文件【/_makeFile/thingskit2.0.sh】中已存在相关环境变量。
cat >> /etc/profile.d/thingskit2.0.sh  << EOF
  export REPLICATE_USER=repl
  export PG_BIN_PSQL="/app/postgresql-15.13/bin"  # Ubuntu
  export PG_DATA_DIR="pgsql的data"  # PostgreSQL 数据目录路径
  export KEEPALIVED_VRRP_NODES="CLUSTER_NODE_ONE CLUSTER_NODE_TWO CLUSTER_NODE_THREE"
  export KEEPALIVED_PGSQL_PRIMARY_NODE_FILE="/dev/shm/keepalived_pgsql_ip"
  export KEEPALIVED_FLAG_FILE="/dev/shm/keepalived_state"
  export KEEPALIVED_VIP=192.168.1.180  #平台对外服务VIP
  export NODE_INTERFACE=ens33  #VIP绑定的网卡
  export NODE_PRIORITY=$((254 - CLUSTER_NODE_ID * 40))  #优先级
  export VIRTUAL_ROUTER_ID=121  #集群标识符,1到255。
EOF
应用环境变量
source /etc/profile4-3、配置Keepalived
创建目录
⚠️ 提示
确保目录/etc/keepalived存在。
mkdir -p /etc/keepalived 下载keepalived配置文件
💡 提示
下载后放入部署环境目录【/etc/keepalived】中。
tar -xvf keepalived.tar验证环境变量有效性
echo $KEEPALIVED_VRRP_NODES
echo $NODE_PRIORITY
echo $NODE_INTERFACE
echo $KEEPALIVED_VIP
生成keepalived.conf配置文件
💡 提示
生成配置文件前确保环境变量正确无误。
envsubst < keepalived.conf.template > /etc/keepalived/keepalived.conf💡 提示
需要将文本【当前节点权重(主节点必须高于从节点),取值范围:1-254。】更新后执行命令。
集群内所有节点priority的值唯一且不一样。
例如:240
💡 提示
需要将文本【高可用对外提供服务的虚拟IP】替换为保障高可用的虚拟IP后执行命令。
例如:192.168.1.240/24。
⚠️ 提示
【高可用对外提供服务的虚拟IP】的子网掩码必须与服务器节点的子网掩码一致。
💡 提示
需要将文本【与虚拟IP绑定的网卡名】替换为当前服务节点的网卡名称后执行命令。
例如:eth0、ens33等。
tee /etc/keepalived/keepalived.conf <<-'EOF'
! Configuration File for keepalived

global_defs {
   router_id 集群内节点间可相互访问的本节点IP


   vrrp_skip_check_adv_addr
   script_user root
   enable_script_security
}

vrrp_script check_vrrp {
 script "/bin/bash -c '/usr/bin/killall -0 postgres && echo "$(date "+%Y-%m-%d %H:%M:%S"): PostgreSQL OK" >> /etc/keepalived/vrrp_postgres.log || echo "$(date "+%Y-%m-%d %H:%M:%S"): PostgreSQL FAILED" >> /etc/keepalived/vrrp_postgres.log; /usr/bin/killall -0 postgres'"
 interval 9   #检查间隔,单位:秒。值必须大于脚本执行时间,否则提示【exited due to signal 15】超时
 user root    #执行监测脚本的用户或组

 init_fail    #设置默认标记为失败状态,监测成功之后再转换为成功状态
 weight -20   #默认为0,取值范围:-254~254
 fall 3       #脚本连续几次都执行失败,则把服务器标记为失败
 rise 2       #脚本连续几次都执行成功,则把服务器标记为成功
}

vrrp_instance thingskit {
    state BACKUP
    priority 当前节点权重(主节点必须高于从节点),取值范围:1-254。
    virtual_ipaddress {
        高可用对外提供服务的公网IP
    }
    interface 与虚拟IP绑定的网卡名
    virtual_router_id 133
    advert_int 1
    authentication {
        auth_type PASS
        auth_pass thingskit
    }
    nopreempt
    track_script {
       check_vrrp
    }
    notify_master "/etc/keepalived/keepalived_master.sh"                     #切换到MASTER时,执行的脚本(自定义操作)。例如:邮件通知
    notify_backup "/etc/keepalived/keepalived_backup.sh"                     #切换到BACKUP时,执行的脚本(自定义操作)
}
EOF
配置文件权限修正
⚠️ 提示
配置文件【/etc/keepalived/keepalived.conf】权限要求严格。
1、配置文件所有者只能属于root。
2、配置文件执行权限只能为644。
chown root  /etc/keepalived/keepalived.conf
chmod 644 /etc/keepalived/keepalived.conf
chmod 744 /etc/keepalived/keepalived*.sh配置文件有效性检测
keepalived -t -f /etc/keepalived/keepalived.conf5、启动数据库(server1+postgres)
💡 提示
只在主节点(server1)上执行。
/app/postgresql-15.2/bin/pg_ctl -D /app/postgresql-15.2/data start启动完后,可以通过navicat等工具进行连接
6、创建数据库用户(server1+postgres)
💡 提示
只在主节点(server1)上执行。
6-1、登入数据库
/app/postgresql-15.2/bin/psql -U postgres -p 5432
6-2、创建数据库用户角色
CREATE ROLE repl WITH REPLICATION LOGIN;6-3、更新数据库用户密码
💡 提示
文档中的用户名和密码一致,具体情况自行调整。
password replpassword postgres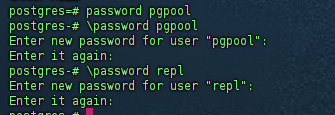
6-4、登出数据库
q6-5、关闭数据库
💡 提示
关闭数据库,后面用系统服务启动。
/app/postgresql-15.2/bin/pg_ctl -D /app/postgresql-15.2/data stop7、账号密码文件管理(all+postgres)
💡 提示【记录行内容】
服务器主机名:服务端口:数据库名:用户名:明文密码
tee   ~/.pgpass <<-'EOF'
server1:5432:replication:repl:repl
server2:5432:replication:repl:repl
server3:5432:replication:repl:repl
server1:5432:postgres:postgres:postgres
server2:5432:postgres:postgres:postgres
server3:5432:postgres:postgres:postgres
节点1的IP:5432:replication:repl:repl
节点2的IP:5432:replication:repl:repl
节点3的IP:5432:replication:repl:repl
节点1的IP:5432:postgres:postgres:postgres
节点2的IP:5432:postgres:postgres:postgres
节点3的IP:5432:postgres:postgres:postgres
EOF
💡 提示
文档中的用户名和密码一致,具体情况自行调整。
chmod 600 ~/.pgpasspsql -h server1 -U postgres -c "l"8、开机自启动(all+root)
8-1、开启系统日志(监控异常)
journalctl -f8-2、创建PostgreSQL服务
💡 提示
请保证ExecStart、ExecStop的内容真实有效。
tee  /usr/lib/systemd/system/postgresql.service <<-'EOF'

[Unit]
Description=PostgreSQL RDBMS
After=syslog.target network.target

[Service]
Type=oneshot
RemainAfterExit=on

User=postgres
Group=postgres
ExecStart= /app/postgresql-15.2/bin/pg_ctl -D /app/postgresql-15.2/data  start
ExecStop= /app/postgresql-15.2/bin/pg_ctl -D /app/postgresql-15.2/data  stop

[Install]
WantedBy=multi-user.target

EOF
8-3、启动PostgreSQL
# 启动服务
systemctl start postgresql
# 设置开机自启
systemctl enable postgresql
#查看状态
systemctl status postgresql8-4、查看PostgreSQL日志(server1+root)
💡 提示
PostgreSQL启动成功才会生成对应的日志。
cd /app/postgresql-15.2/logs
ll
cd /app/postgresql-15.2/logs
lltail postgresql-2026-05-21_000000.log -f8-5、创建Keepalived服务
💡 提示
请单独执行命令,保证ExecStart的内容真实有效。
tee  /usr/lib/systemd/system/keepalived.service <<-'EOF'
[Unit]
Description=LVS and VRRP High Availability Monitor
After=network-online.target syslog.target
Wants=network-online.target
Documentation=man:keepalived(8)
Documentation=man:keepalived.conf(5)
Documentation=man:genhash(1)
Documentation=https://keepalived.org

[Service]
Type=forking
PIDFile=/run/keepalived.pid
KillMode=process
EnvironmentFile=-/usr/local/keepalived/etc/sysconfig/keepalived
ExecStart=/usr/local/keepalived/sbin/keepalived  $KEEPALIVED_OPTIONS
ExecReload=/bin/kill -HUP $MAINPID

[Install]
WantedBy=multi-user.target
EOF
8-6、启动Keepalived
💡 提示
Keepalived启动后,备节点会自己执行命令从主节点同步数据。
# 启动服务
systemctl start keepalived

#查看状态
systemctl status keepalived
8-7、查看Keepalived的sh脚本日志
cd /var/_logs
ll
tail keepalived_notify20260520.log -ftail keepalived_vrrp20260509.log -f9、验证&运维相关操作
9-1、查看集群数据同步状态
💡 提示
使用Keepalived管理的VIP访问数据库。
select * from pg_is_in_recovery(); 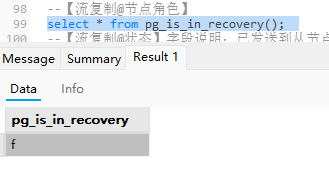
SELECT * from pg_catalog.pg_stat_replication;
9-2、故障转移
💡 提示
关闭主节点,观察:
1、VIP地址是否能正常访问。
2、集群内数据同步状态。
9-3、故障节点恢复
💡 提示
重启备节点,观察:
从节点数据服务状态。